::Long, sappy intro about crossbows here::
Well, now that that’s out of the way, I want to put up the new guide to modding a crossbow, from start to finish, and from someone else’s terrible finish, back to start, and up to your perfect finish. This is completely intended to replace the old article about levels (I mean seriously, a Level 2 crossbow is stock, but with E-tape to cover the hole in the original barrel).
Here is our subject: The crossbow. This one has been through two owners, and two waves of modifications. The first was to bring it up to “Level 4,” which is merely a reinforced spring rest and having the barrel out the front. The second included gashing holes for integrations and adding epoxy and hot glue galore. Add on an “intentionally rough” paintjob and you have this:
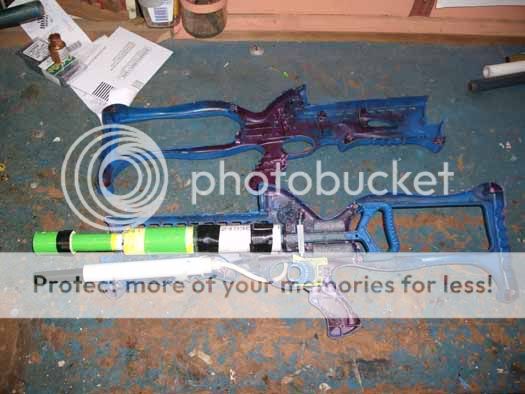

We begin.
Clean up.
Taking out the internals, rip off that “integration” glued to the side, and set it all out of the way for now. Don’t be afraid if you find things like this:

What you want to do is to rip all pre-existing mods out of it, or at least the ones that you’re not completely positive are very well done. This is, after all, your crossbow.
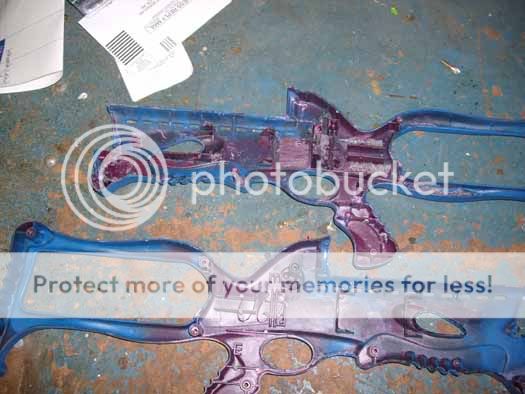
There are a lot of tricks to doing all of these things right, well, and easily. I’ll put down most of the big, important ones.
Removing hotglued metal: A good set of pliers does you well here. You can generally just hold the shell or piece and pull. If the metal is shrouded in hotglue (i.e. nail in glue, post reinforcement), the same applies. Grab at the hot glue and pull. It will either start coming out and exposing the metal, or it will break off into chunks. If the latter, keep at it until you can get the metal.
Removing hotglue on the shell: This is a really common one. Again, start with a good set of needlenose pliers. The hotglue prefers to stick to itself than to the shell, so it will generally pull right out in one or two big pieces, pretty cleanly. There are two major exceptions to this – 1) the glue is a thin layer 2) the glue flakes off. Solutions: 1) There are two ways to go about this. The first is to add more hot glue on top, then go back to the pliers. The second is to spray a good amount of silicone based lubricant onto the glue. After letting it soak in (approx. 20-30 minutes), try prying it out with a dull chisel, or narrow (<1″) head scraper.
Removing items that were epoxied on: Be gentle with these. Rocking the item back and forth for a few minutes almost always does the job. If it’s a small piece, and it hard to grab hold of, blunt nose pliars are much better over the often damaging needlenose version in this situation. Another answer here is to use a chisel or fine tipped tool to carefully pry the epoxy off of the sides of the attached piece, until it comes out. Use needlenose pliers to remove as much epoxy as possible.
Foam Backer Rod (FBR) or Caulk Saver hotglued: Pull the foam out either with needlenose pliers, or with your hands. This will leave a small layer of left over foam with the hotglue. Now you can use the method for removing hotglue on the shell.
Small pieces, attached to small pieces: Here’s a good example of what I had to deal with. The crossbow trigger is small, and while not completely uncomfortable, could use improvement. That will be dealt with later. This is the product of an attempt at that mod:

Quite unacceptable. A few smacks with a rubber mallet should pop it right off. Since most people don’t use the most secure way of attaching pieces to each other (covered later), this is generally not a problem. If the small pieces can’t really be hit with a mallet, vise or hold one object at the joint, and use needlenose pliers on the other piece at the joint, and pry them away from each other in order to break the connection.
Sanding, and otherwise redoing the paintjob.
Clean and sexy. Words commonly used to describe a good cosmetic job. That’s not what’s on this bow. But it will be.
Start by roughing off the top layer or so of paint with 60 grit sandpaper. Gradually work up to a 600 grit. Wet sanding is definitely your friend here. This will be the most time consuming part of this whole guide. Both shells together took about 11 hours of total sanding. By the time you go to paint it, you’ll want it at 800 grit, but I’ll cover the repainting part later in this guide.


Hit the plunger tube pretty lightly as well. You can also sand the outside of your integration tank if need be, but don’t go overboard. I did mine just to show; my entire integration is internal.
Plunger Repair and reinforcement
Inc: Catch reinforcement, spring replacement, plunger head repair and replacement
For this next part, you will need the following:

That metal is 1/16″ aluminum, that can be bought from Home Depot or Lowe’s for about $3 for 6 feet. Very cheap, very useful.
Now the plunger for this crossbow isn’t broken at the catch (or at all) like most, but if it is, the same steps apply for repair.
First and foremost, we need to cut the aluminum. Using the snips, cut it to equal the length between the plunger head base to the longer side. Then cut straight down the center along the length. You should end up with something like this:
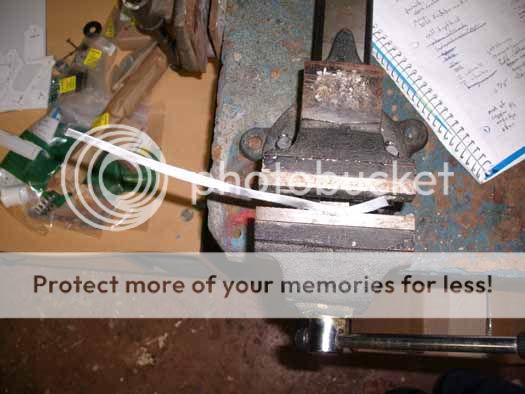
The snips probably have mangled it like so. All you need to do is to vise it at the turns, and squeeze it down. This may take a while, but it’s important that it’s flat in all directions.
Once it’s straight, snip down the one side to the proper length (one side will need to be shorter than the other), and mark the catch spot, as well as any spots that are too wide, and need to be shaved down:


Now you have to cut out those marks. Vise the piece, wear safety glasses, and carefully Dremel out the gaps with a reinforced cutting wheel.

Make sure both sides fit, and pull out your drill.

Pilot through the two pieces of metal and the plunger all at the same time, while they’re put together and on a flat surface. I used an 1/8″ hole, and #4-40 screws at 1/2″ length. Assemble. We’ll need to shave down the excess from the screws so that they don’t catch the spring. Move the plunger to your vise. Carefully dremel down to the washer. Here, you can see the first screw done.

Throw your spring on really quick, to make sure that it doesn’t catch on anything.

The next big thing in this step is to reinforce the back of the catch. Take that long aluminum stripping that we used some of for the plunger, and cut a 3/16″ piece off of it.
Rough up one side of the lip that catches, and fill it with super glue. Throw in your tiny rectangle, and clamp it down until the glue is dry. What you want to do now is to put a thin layer of hot glue over that. When that layer dries, do another, and then another. This will seal it in, and distribute the force from the spring moreso into the surrounding plastic and rubbery glue than before.

Next to cover here, is the plunger head. There are many things that happen to plunger heads, and I intend to show how to correct the most common ones, and how to get a perfect plunger seal, without electrical tape.
I’ll start with the perfect seal. It’s quite simple. If you’re using the stock plunger tube, use a 1 1/4″ Neoprene washer under the plunger head, like so:

If you’re using the replaced plunger tube (later), use the stock plunger head (no matter if it’s shriveled up or not, the skirt is the perfect size for a seal).
Another problem is if that white ring (see above picture) snaps. This most commonly happens if you shoot a lot, since it’s the impact that shatters the ring. This ring holds the spring in, and without it, the gun won’t work at all. The plunger head will get pushed off, and the plunger will just pull back with no resistance. To replace it, you need only a 3/4″ fender washer, cut just like so:

And there’s your replacement.
A huge, recently common problem is if the entire plunger head stem breaks off. This is more prone to occur if you store the gun while it’s primed, as the constant force on the stem weakens it over time, until it shoots off. The best way to repair this, is to pilot an 1/8″ hole about 1/2″ down into the center of the end of the plunger rod. Take a nice fat 3/4 – 7/8″ mounting or wood screw, run a 3/4″ fender washer, then your plunger head neoprene washer, then another 3/4″ fender washer (both uncut), and screw it into your piloted hole slowly until it can’t go any further. If you’re using the replaced plunger tube, a 1 1/4″ neoprene washer will do the job, but a 1 1/8″ one will be the perfect seal. They’re just significantly harder to find.
After all of that, you should be ready to assemble your plunger rod. Put the catch on first (metal side towards the handle, not the head), followed by your spring of choice – DT3 arrowshooter is most common, and is what I used. Then goes your plunger head, however you chose to do it.
Internal reinforcements, out the ass.
I’ll start with the basics, and move my way up on this one.

We’ll start with the spring rest. Here is my right side, cleaned up shell:

For this you’ll need two 1 3/8″ nails. Run a bead along the inside of the spring rest, and put a nail in there. Add layers of hot glue over it like we’ve done in previous sections, one after another, after the previous one has dried. You’ll need one in each side of the rest.

Now cut out a 5 1/4″ x 1 3/8″ rectangle from some sheet metal, and fold it like so:

Mark the slit from through the back, and make it too long. Finally, cut the vertical lines only. Lay down a liberal layer of hot glue where the piece needs to go, then place it there. Place hot glue on the back of the spring rest in the middle, then fold down the center onto it. Cut off any excess.
Next, is to reinforce the plunger tube rests. You’ll need eight 5/8″ x 3/8″ rectangles out of sheet metal. Hold each one up to a spring rest, and mark the curve, then cut the curve out:

Hot glue the rest, then use pliers to apply pressure to each piece of metal onto the rest.
Last two steps completed:

Last, but not least in this section is reinforcing the plunger slides. I hear/tell, that after a while, if you don’t grab the plunger handle and pull straight back every time, after a while the rests may crack. Not really a big deal, but I want this thing to last forever. Four 1 1/2″ x 5/8″ x 1/4″ polycarbonate rectangles, sanded via dremel at the post points, hot glue layered on:

And here’s the left side after this section:

You can see here, that I actually Dremeled off the part that the spring rests push against on this half of the shell, and replaced it with 1/4″ polycarbonate. If yours is cracked or otherwise broken as mine was, I recommend doing this as well.
Replacing the plunger tube
If, for some reason (cracks, looks, seal), you need to replace the plunger tube, it’s not all that hard to do. Stop by your local homedepot, and go to the plumbing section. Pick up one of these:

It’s called a 1 1/4″ plastic Extension tube slip joint – 12″. It’s typically used as a coupler for bigger pipes. It’s perfect for our applications.
Start by cutting your plunger tube to the desired length, using only the narrowest part (right side in the picture). Mine was 7 3/8″ long, and it turned out dead sexy. I used pipe cutters to make a decently straight cut here, but they don’t work on the next part. Cut two, minimum 3/8″ width, rings from the next higher width section (second from the right in the picture), and slide them over your plunger tube. Use a combination of super glue and hot glue (again, in layers) after roughing up the plunger tube to attach it where they need to be. A 1/2″ Pvc coupler should fit tightly inside the front of your plunger tube. Use a rubber mallet if necessary to get it in there.

For cushoning and to fill dead space, I put a 1″ piece of sch 80 PVC into the inside half of the coupler, then put a few inches of 3/4″ pipe insulation (the length will depend on the length of your plunger tube) that I cut a length wise section out of, in order to get the proper diameter. This is very effective padding.
Screw post replacement
Many of my screw posts had been unnecessarily removed, completely ripped out, and/or were otherwise unable to use screws. They needed to be replaced.
Cut them from other guns (I know most of you have AT2k shells just sitting around, and you definitely will if you’re integrating a 2k into this), then cut the post down to the correct length.

You’ll notice that these posts are extremely small compared to the xbow parts, so we need to compensate for the difference. Spray some silicone lubricant onto the corresponding xbow post-thing (anyone have a good name for this?), and hold the new post in the center of it. Now put an overflowing ring of hotglue around the new post, and hold it there until the glue has cooled.

Use extremely liberal amounts of hot glue to hold these in place.
SUPER HAIR trigger, swappable finger grips
Swappable trigger grips. One of the many gripes I hear about crossbows is the uncomfortable trigger. There really hasn’t been any standard way to fix this, and it often has to be redone if it’s ever sold. This allows you to switch out between several grips to fit whatever fits you most comfortably.
To start, just cut a 3/4 circle out of 3/4″ Sch 40 pvc and glue it onto your trigger (after a little shaving off of the top). At this point, you can make different grips out of bases of 1/2″ pvc. Pictured are a 1/2″ x Sch 80 and a 1/4″ x Sch 40:
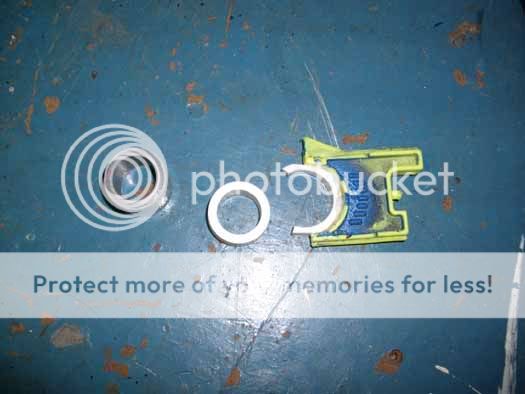
You can really take this anywhere. They pop in and out, and can be glued in once you decide on the one you like. I stuck with a 3/4 circle 1/4″ x Sch 40 with a piece of cpvc on the inside shaved down where your finger goes. You can make it so your finger goes on the inside or outside, sticks out a lot or a little. You can curve the sides for your finger to curl around better; you can set it off center or a multitude of things.
Super Hair trigger.
I saw a “write-up” on crossbows, that explained how to make a hair trigger for the crossbow via a small paint image. He said that he tried it; I don’t believe him. I tried it. I’m going to show you how to do it. Keep in mind, the crossbow is already renowned for its awesomely hair trigger.
Trace the slant of the top piece of the trigger onto a piece of 1/8″ poly carbonate, then slide the trigger to the side and trace it again. This should give you two parallel lines. Put a horizontal line between them, and a vertical line at where you want it to end, then cut the whole shape out.

Now super glue that shape onto the trigger. (Here it is with my finger grip of choice)

You’ll need to cut the shape down of course. What I found is that making it a triangle with the thinnest point at where the catch is before you pull the trigger. This stops the misfires that happen if that point is too high, and still allows the trigger pull to be shortened. What happens though, is that if you do the next part – the integration with linked trigger – when you go to pull the trigger back the rest of the way to fire the secondary, the catch can’t travel up anymore and the trigger can’t pull any more. This leads to a rounded shape, which is ultimately only semi-effective, since the catch will occasionally get caught on the top of it. A complete solution would be the rounded shape couplered with a more powerful trigger spring, but I opted to instead remove it and maintain the light trigger pull.
Internal integration with linked trigger
Here I’ll be integrating a singled 1500 under the primary crossbow barrel. You need the normal 1500 internals, some 1/4″ tubing, and one or two tubing connectors.
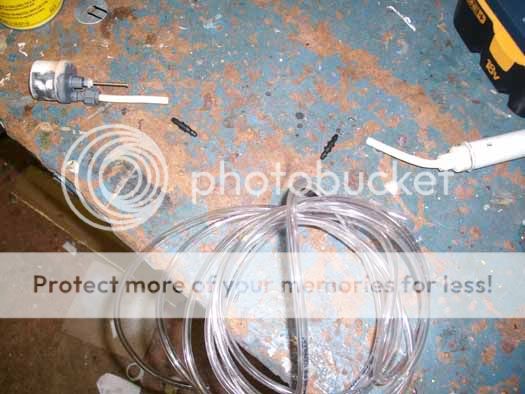
The normal route is to use the connectors to run extra tubing between the existing tubing spots, but I preferred to just run the tubing straight into the tank. It makes the tank easier to place, since you don’t have to deal with that solid piece sticking out. To do this, just snap or dremel off the old tank tubing, and use a 7/32″ bit to drill about 1/4″ into the tank at that spot, then jam the tubing in and goop it.
Half a coupler, and glue it on as straight as possible (or at an angle to compensate for an angled cut if necessary). Cut the spot in the front of your gun for the tank and coupler as clean and, more importantly, as straight as you can. I made two brackets for the pump – one for the hole at the top, and one stabilizing one on the pump tube. Damn sexy if you ask me. Find the desired length and cut and connect your tubing.
For the linked trigger, you need some solid wire, not flexible stuff. Make a ring at one end around the sliding plastic piece and glue it down. Leave about 1/8 to 1/4″ slack between the end of the plastic piece and the end of the tank pin, and attach the wire to a 1/16″ hole in your trigger:

This system works extremely well, to all of you who said it wasn’t possible. It works as such: You pull the trigger back, pushing against only the trigger and catch spring, the crossbow fires. You pull back more, the slack in the wire ends, and you now feel the (strong) spring from the pin resisting your movement. Continue pulling back and the integration fires. You can pull the trigger back quickly and fire both; you can not have the xbow primed and fire only the 1500. It’s versatile. It’s powerful. It’s clean. Boo yaa.
Filling shell holes and otherwise sexifying your crossbow
Inc a quick guide on how to paint
Without the tank, the gun looked like so:

I cut down the front around the plunger tube and where the tank was going, then used 1/8″ plexi to fill it in super cleanly.

I then filled the seams in with too much epoxy putty. I filled any other holes the same way – with too much, except for width ways. It will shrink, but you need to keep the width correct. It’s a good idea to do one side of the shell before the other, so that you can compensate for any mistakes. Then carefully and slowly sand the putty down to the same grit as the xbow.
Laying down the paint: I follow the words of Direct Threat:
“If you really want to make your paint work –
1. strip the gun bare
2. Wash it in as hot water as you can put your hands in (not hotter) using dawn (lots tried but it works best)
and you have to do it INSIDE and out. Otherwise oil from in will gt out and mess you up.
3. Sand with 800 grit- lots of sanding! then some more. How to know your done: When water “sheets” when rinsed AND your fingers (clean fingers) stick. Also there is uniform sheen and no shine.
4. Black vinyl dye
5. Start paint layers
7. More paint- it is THIN not thick – also now the metals and toners go on
6. Highlights
Highlights include VERY thin use of clear to “tack” them down – this is not top coat coverage
7. Repeat number 6 as needed
8. Any “wash” techniques if desired
9. Cure time and sometimes heat cure
Big smiles…your done…it took a long time but the product is worth it.”
My results:


Damn sexy indeed. The white was supposed to be “pouring out” of the holes. And those barrels are remarkably straight, aren’t they? 🙂 Enjoy.
